Thursday 25 February 2016

"Never Tell Me The Odds" - PART II - X-Wing Dice for Squadbuilding

In the first part of this blog about how the basic dice maths of X-Wing work I really focused on the basics and highlighting some of the simple ways that even the most mathematically-challenged players can keep a few rules in mind that will help them shoot straight and harder.

In this second part I'm going to be spending more time looking at how you can use Maths before you even get to the table, in helping you plan your squads.


Better Planning Through Dice

I'm going to run through a bunch of scenarios where I've actually used some quick maths and dice calculations to decide how best to equip my squad for battle.  All this has been done with the wonderful number-crunching help of:


What I did first of all was set up a 'straw man' for my ships to face: an X-Wing, which is a ship with 2 agility for me to shoot at, and who is firing 3 red dice back at me.  In that hypothetical scenario of "me vs X-Wing" I wanted to see what various loadouts and options would mean for how much punishment my ships would deal out (against 2 green dice), and also how durable they would be under fire (from 3 red dice).  

How much damage would I take on average?   How many shots would it take to kill me (which matters when you're comparing ships with different amounts of Shield/Hull)?


DISCLAIMER:

Crunching numbers like this is very useful for comparing ship's performance to each other (saying "if I include Twin Laser Turret my damage output goes up by x%") but there are limitations to how accurate that is in being applied to reality.  A great example would be the Lambda shuttle, who with 3 red dice and a huge Hull/Shield looks really good in this sort of analysis, which ignores the limitations of the maneuver dial.  Another example is that I tend to assume actions like Focus/Evade/Target Lock but against multiple attackers those tokens may not always be available.  Basically, take the numbers for what they are and let them help you make decisions but don't rely on them entirely.


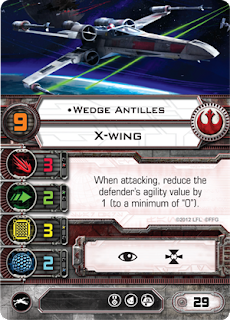
If you've been reading my blog all the way through you'll know that I have a bit of a man crush on the T-70 X-Wing, but I was looking at also including Wedge Antilles in his older T-65 X-Wing because his pilot ability is very strong.  At the time I really liked the idea of giving Poe Dameron the 'Lone Wolf' elite pilot talent.  Being able to reroll a blank dice, and then flip a focus roll into a hit/evade without spending the Focus seemed like a really powerful combination - Poe would hit like a train and would also be able to survive vs multiple attackers.


The downside of this was that I felt like Wedge was a real weak spot as the T-65 rolls with one less shield than the T-70.  Integrated Astromech could give Wedge an extra hit point in a pinch, but I'd given Poe (the tougher pilot) the elite pilot talent that made him more durable (Lone Wolf).  Poe was hitting slightly harder than Wedge, but was as much as 70-100% harder to kill.  I wanted to look at what happened if I flipped the Lone Wolf onto Wedge instead.


This balanced things up a bit, but now I had two ships that weren't particularly tough, and in moving Lone Wolf over I'd actually taken a lot of the 'teeth' away from Poe and in fact he was just worse than Wedge in every respect.  I didn't like this build because it put everything onto the ship with the worse maneuver dial, and also Lone Wolf requires a ship that can handle itself away from the pack - it made sense to boost Poe to a survivor spec with Lone Wolf, but Wedge with Lone Wolf was still in a tough spot if he was out on his own.  It didn't make sense.

(This, by the way, is a perfect example of what I said in the disclaimer about using the numbers to inform decisions, but not letting them make decisions for you.  You understand the context of the game far better than the dice do!)

So, settling on the idea that Wedge would have to be a 'glass cannon' I looked at what elite pilot talents would best enhance his firepower while he was still on the table: Outmaneuver to strip a second Agility away from his target, or Predator to reroll his own dice.  


This direct comparison proved that even in situations where you could trigger Outmaneuver AND the opponent had a second Agility to strip away... Predator was still marginally better, for the same cost.  This, BTW, explains precisely why you see so many people playing Predator and very few playing Outmaneuver - Predator is just plain better in almost any situation, making it the go-to elite pilot talent of choice for players looking to maximise their damage output.

Now it turned out that the 36pts I was spending on my Wedge/Predator build (with R2 for survivability) was the exact same as the 36pts I could choose to spend on a "Red Ace" T-70 with Comm Relay and R2-D2...


"Red Ace" traded approx 35% of Wedge's firepower for a boost of over 200% in durability!  And that was before I even factored in that "Red Ace" would live longer and thus use R2-D2 more often, and thus generate more Evade tokens... so the true defensive upgrade of "Red Ace" was probably even higher than this.  It was "Red Ace" that I flew in my Store Championship, and I was very happy with that change.  Yes he hit a little less hard but he stayed on the table much longer than Wedge would have done, so over the course of the day his damage output was almost certainly better (plus in the last game of the day his Tallon Roll was a key maneuver in taking down Carnor Jax).

So... to finish this example off.  Does that simple comparison between "Red Ace" and Wedge capture every difference between the two ships?  No, there's Wedge's higher pilot skill to factor in, there's the better maneuver dial of the T-70 X-Wing, there's the likely number of red and green dice from opponents to factor in.  But it gave me a very good summary of what the difference between the two ships was, which clearly informed my decision. 


Ship to Ship Comparison

So I took that basic structure of "Me vs X-Wing" and have since been applying it to a bunch of other scenarios to see how things change (again vs that same hypothetical X-Wing), and I think it can be really interesting.


This chart explains why you see Soontir Fel so often in tournaments but hardly ever see a basic TIE Interceptor.  With Push The Limit to assign both an Evade and a Focus token, a Stealth Device to give another green dice and then Autothrusters to help at Range 3 the TIE Interceptor goes from being a flimsy investment to one of the toughest ships in the galaxy!  Trying to pick off Soontir Fel at range 3?  Good luck with that!

On the flipside it also shows precisely how important it is to deny the Interceptor aces those actions that stack the Focus and Evade.  If you can stress them or cause them to bump into another ship then their odds of survival plummet dramatically once they're left with just 3 Hull to rely on.  So that one table above is telling us not just how to build a TIE Interceptor, it's also telling us how to beat TIE Interceptors!


This was an interesting one, because I was looking to see the difference in survivability between big ships with no agility but a lot of Shields/Hull (like the Decimator) vs a comparable big ship that has some agility (like Slave I).  The ability to evade at least some of the attacks makes a big difference so despite having 38% less hit points Slave I is actually 30% tougher than a naked Decimator.  You'd think that 16 combined hit points would make the Decimator a real tank, but when it has to take every hit on the chin because it can't roll any evades you'll find it a tank you can't rely on for long!


A lot like the TIE Interceptors you seem to rarely see a basic Decimator in tournaments and it's frequently combined with the combination of Commander Kenkirk as the pilot and Yanne Isard as Crew.  This adds 20% to the cost of the Decimator but improves your survivability by a huge amount.  This is because once those Shields are down you gain an Agility and a free Evade token!  
(for transparency that 'Shots to Kill' for the Kenkirk Decimator includes 5 damage to remove shields without the Agility/Evade and the rest with the extra defensive buffs).


And lastly, after focussing on how much damage ships could take for a few examples, I wanted to look at a change in firepower in another common archetype - the "Super Dash" YT-2400 build that trades the basic 2 dice of the freighter's turret for the Heavy Laser Cannon on a unique 360-degree mount.  You can clearly see the trade-off in firepower, with the Heavy Laser Cannon unable to fire at Range 1 at all (the YT-2400's barrel roll action tends to keep them at a distance to use the Heavy Laser Cannon) but pouring out VASTLY more damage at range 2 and 3, where the "Super Dash" build spends most of its time.  Is that extra 2+ damage per shot worth the 12 points to mount the Heavy Laser Cannon (7 for the cannon, 5 for the Outrider title)?  Hell yes, it's worth it!


DIY vs TLT


The Dice Probability Calculator tool means that adding some science to your squadbuilding like this is not hard to do, and you can do it to!  

You don't have to use an X-Wing as an example if you think another ship is more important as your test target.  I was listening to World Champion Paul Heaver talking on the Scum & Villainy podcast about how he prepared for Worlds 2015, and he said he basically built a table of which ships were most effective against Twin Laser Turrets.  

Given how many TLT Y-Wings and K-Wings there are around at the moment it could be really useful to plug one of those in as your testing target and re-running some numbers.  This could be especially useful because the unique way the Twin Laser Turret deals multiple little nibbles of 1 damage is different to most other ships you'll face... and the helpful Dice Probability Calculator will do all the tough stuff of crunching the two shots from the TLT for you!


I did an example to show you, comparing a B-Wing to a TIE Interceptor when faced against a Y-Wing with Twin Laser Turret.  The B-Wing and TIE Interceptor both have the same damage output, but even though the TIE Interceptor has more Agility and is stacking an Evade token (in this hypothetical example) the Twin Laser Turret will burn through the 3 Hull of the TIE Interceptor faster than it would the tougher hull of a B-Wing.  This is because the B-Wing's low agility isn't being 'punished' by the Twin Laser Turret being able to deal multiple damage in one shot.  

But is the B-Wing tougher than a TIE Interceptor in a fight against a non-TLT ship, say a T-70 X-Wing?


The TIE Interceptor is tougher here because the higher Agility (and particularly the Evade token) are more useful if you're only being shot at once per turn instead of twice.  Notice how the B-Wing is more durable at Range 1, though?  That's because at Range 1 the T-70 gets a 4th red dice... the 'Overload' dice against the Interceptor's 3 green dice!  I explained in the last blog how important the Overload dice were, and it's getting that 4th red dice which suddenly increases the damage that the Interceptor has to take.

In fact, the B-Wing's survivability doesn't change much against either target, while the TIE Interceptor's lifespan is almost halved by the Twin Laser Turret - definitely worth knowing!

The permutations of ship vs ship are endless and will drive you wild so I don't recommend you plotting every ship vs every ship, but if you know there are a lot of a particular build of ship in your local metagame then it's probably worth factoring your ships against that to help you pick the best performers.  


I've found that if I model a ship against a TLT Y-Wing, Soontir Fel and Poe Dameron then I've covered off most of the obvious bases.  You need to know how you respond to TLT attacks and the Y-Wing is also a low agility target that resembles a B-Wing or similar clumsy ship.  You're certain to run into Soontir Fel at some point and he represents the high agility target where you need to throw enough dice through all his defenses.  Poe Dameron is a pretty average target, rolling plenty of attack dice, having agility and some health.... really middle of the road.  

You could layer on "what do I do vs Omega Leader", "what do I vs Super Dash" and so on if those are more revelant, but for a good quick guide then I think Y-Wing, Soontir and Poe cover a lot of ground.


Target Lock vs Focus vs Evade

Finally... as well as comparing various ships and loadouts this dice template is a simple tool for comparing the outcomes of different actions... are you better to Target Lock or Focus?  Should you Boost forward a range?  If you're under fire should you Focus or Evade?

We can use the same basic template (vs that hypothetical X-Wing, remember) to see the outcome of these decisions.  First of all, let's look at the difference between a Focus and a Target Lock.


Well, that's straightforward!  A Target Lock provides no offensive benefit over a Focus token and you don't gain the option of having any defensive benefit either.  It's a slam dunk that you should always Focus, right?

Well... no, in fact if anything its the other way and you should Target Lock unless you've a reason to Focus.  This is because an unused Target Lock stays on the table.  If you roll three red dice and get three hits then you didn't need either the Target Lock or a Focus, but if you went for a Target Lock then it's still there next turn, allowing you to also Focus and hit your opponent with both positive attack modifiers...


There's another minor benefit to the Target Lock, which is that your rerolls can always turn into Critical Hits, while Focus only flips to basic Hits.  Unless you think you need that Focus for defense then Target Lock is your best shout.

Ignore the fact a T-70 X-Wing can't usually Evade - we're dealing in hypotheticals here!
Next up, if you're coming under fire then a Focus can flip more Evades your way and adds 30-40% to your survivability (more at long range, where you get that extra green dice to throw).  An Evade, though, is a guaranteed extra Evade on top of your dice and it definitely outperformed the Focus in terms of pure defense.  So if you're limping along on your last hull, or you feel like you're shooting early in the Combat Phase and won't know if you can afford to use your Focus anyway, then put the Evade on - it's better to be safe than star dust!

And one last choice that comes up quite frequently (I've had it many times with my T-70s) is whether or not you should Target Lock/Focus, or use a Boost to close the range and roll an extra red dice.


On paper this is a pretty clear decision - a Target Lock or Focus adds 70-80% to your damage output, while boosting closer without a Focus/Lock adds only approx 35-45%.  So you should never Boost, always Focus?  Well, yes in theory but actually kind of no, and I think this decision is more nuanced than that.  Yes, if you're chasing down a ship with one Hull left on the last turn of the game then the maths are that your best chance of doing that damage comes from a Focus or Target Lock.  But although Boost is worse at dealing damage that turn the benefits of being at a closer range could multiply over future turns if it means you're now on their tail at a whole range closer, rolling an extra dice every turn.

When I'm faced with the Focus/Boost decision I actually tend to flip it on its head.  Instead of asking "how much more damage do I do with the Boost vs Focus" I ask "how much damage am I prepared to sacrifice for a better board position".  That boost might get me closer for a few turns, or it might get me clear of an asteroid for my next maneuver, or move me out of another ship's firing arc, or change my heading by 45 degrees for next turn.  That it does all this while also adding 40% to my damage output is just gravy - I'm in the Boost action for the positioning and not the damage.

The one niche situation where the Boost really comes into it's own for damage-dealing reasons is when you're really desperate and need to get lucky.  Rolling three red dice with a Focus has a really good chance of getting you three hits... but it can never get you four hits.  A Boost into Range 1 can, though.  Yes, the odds are against you but if it's your last big throw of the dice and you need to deal four damage to win the game, then Focus is a 0% chance to win the game, while Boost is like 2% or something.
Tuesday 16 February 2016

"Never Tell Me The Odds" - X-Wing Dice for Beginners

Back in my first blog about X-Wing I launched right into sharing a bunch of things that I'd learned about how ships maneuvered and some common tips and tricks that I thought were worth knowing.  X-Wing is a game of two halves, though, and what happens in the Combat Phase is just as important as what happens in the Planning & Activation Phases, so this time around I want to look at the dice of X-Wing, and some of the wonderful maths that spins off it.


Now, if you're a serious maths-head then the internet is full of great places where people have already crunched a lot of the X-Wing numbers.  I'm going to try and boil some of that hardcore number crunching into something more digestible for those who aren't in the mind to drill everything to three decimal places.

That said, if you ARE the type of person who wants to know the maths properly then for some extra-curricular reading you can check out some of these place:

Mathwing (an opus of X-Wing Math)


And also: right before I sat down to write this blog there was another great dice-related blog at Not Such A Bad Pilot that I recommend reading as we cover a lot of the same ground.


The Basics

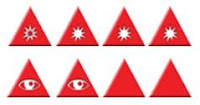
Ok, so now that the egg-heads are gone we can really get into it... and I'm going to start right at the start because I think a fair number of X-Wing players have probably never even picked up the dice they're rolling to see what's on the eight sides.


Hands up if you though the dice were going to be balanced - that the same number of hits on the red dice as there are evades on the green dice?  A few of you, I bet.  Yeah, initially I would have assumed the same as well, but in fact the game is weighted towards ships being able to deal damage (and it's a good job, or you'd be playing forever with pristine untouched ships!).

When you roll a red dice you've got a 50% chance of rolling a hit/critical, rising to 75% chance if you have a Focus token to spend.

When you roll a green dice you've only got a 38% chance of rolling a Evade, rising to 63% if you have a Focus token to spend

So in the scenario where you've got 1 red dice against 1 green dice, and no Focus tokens, 50% of the time you're going to roll a hit, and then 62% of the time they're going to roll something other than an Evade.  Combine those two facts and you've got a 31% chance of dealing damage.

50% x 62% = 31%

If you add Focus tokens into the mix then it gets slightly harder to hit the target, as the hits out number the evades by only 6 to 5, instead of 4 to 3.

75% x 38% =28%

Those numbers aren't hugely different, though, so it's easier to just remember ~30% chance of a hit with/without a Focus.  The trouble is... how often do you ever roll just one red dice? (HWK-290 owners, you have my sympathy)


1 plus 1 does not equal 2

So if you're normally dealing 0.31 damage with 1 red dice vs 1 green dice, then that doubles when you roll 2 red dice vs 2 green dice, right?  So now you're dealing an average of 0.62 damage with each shot, right?

Wrong.

What we also need to take into account is that we've been looking at the 50%/75% of times when you rolled a Hit, because if you got a Blank on your red dice then we don't care what the defender would get with his dice.  In reality you DO care when you start rolling multiple dice, though, because the defender might have rolled an Evade against your Blank red dice and can use that Evade against your other red dice that you've rolled at the same time.

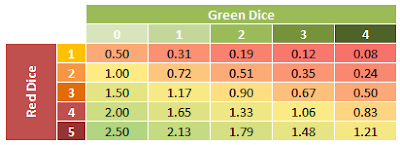
In fact the average damage you deal with with 2 red vs 2 green dice isn't 0.62 (assuming nobody has a Focus), it's only 0.51.

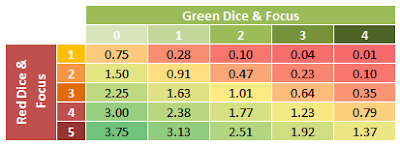
I could go on with umpteen examples of dice vs dice, but it's just easier to show you the tables.


Right, before you go crossed-eyed trying to work that out in every possible scenario let me cut that right down to the chase for you and tell you what it really means.

You need to be rolling more dice than your opponent.

Period.  Full stop.  Drop the mic.  We're done.  

If you want an "X-Wing Dice Strategy 101" boiled down to three words then those three words would be "Roll", "more" and "dice", used exclusively in that order.


Overload Dice

When you roll a red dice against a green dice you've got about a 25% chance of dealing damage  The exact % depends on how many red dice are being thrown against how many green dice and whether you're focussed etc, but it stays in that ballpark.  When you roll an extra red dice that isn't opposed by a green dice (what I call 'Overload Dice') then your odds of dealing damage with that dice improve HUGELY - to 40% without a Focus token to burn, and 60% with a Focus.


That's the benefit of the Overload Dice - a huge jump in your chance of actually dealing a damage, from 25% with an opposed dice to 60% with that Overload dice!  And in fact if you roll a second or third Overload Dice then the odds on those dice get even better (as there's less chance that your opponent rolled enough 'spare' Evades to cancel out yet more red dice).

You may think that going from 2 red dice to 3 red at Range 1 is a 50% increase in your damage output (rolling 3 dice is 50% more then 2 red dice), but if the target has two agility then you're adding an 'Overload' Dice and it's more like a 100%+ increase in damage!

Oh, and finally, a quick word about what Focus is doing in those tables.  The difference between neither player having a Focus and both players having one is that Focus accentuates the advantage for the player with the most dice.  This makes sense - Focus affects all the dice you roll so the more dice you roll the more chance you have for Focus to lend you an edge.


Implications of Overload Dice


NOTE: When originally published this section of the blog contained material errors.  I've rewritten this section to provide a more accurate view.

We can step away from theory for a moment and talk about some real ways that this drive for 'Overload Dice' will impact how people fly their ships to create a positive mismatch and, more importantly, how they build their squads.

Let's think of a Rebel player who is trying to decide how to round out his squad.  With his last 24 points he could bring in either two basic Z-95 Headhunters or he could play a single T-70 X-Wing instead, and the deciding factor is which ship will do the most damage?.

The most obvious way to look at this is that the two Z-95 Headhunters bring a combined four red dice to the table, while the X-Wing only has three red dice, so if you take the two TIE Fighters you get to deal more damage.

Except that's not necessarily true, and in fact in many scenarios the single X-Wing is more dangerous, even though fewer red dice are rolled.  

Why?

When you roll your red dice twice, you're also allowing your opponent to roll his green dice twice!

It's really obviou when somebody explains it to you, but a lot of people don't think that far ahead and just assume "4 dice is better than 3 dice".

What you get is a more nuanced picture where you need to consider what you're likely to fly against.  When your opponent doesn't have many green dice to roll in his defense then the Z-95 Headhunters pay off in more damage output, but when you're up against ships with high Agility, or with Evade actions, then the two red dice of the Z-95s are going to really struggle to 'punch through' without any chance of getting an Overload dice.


I can actually get very topical here, because in the last week FFG have spoiled the upcoming Jumpmaster-5000 ship with the option of spending a whopping 12 (twelve!) points on a Title called Punishing One (the ship belonging to the bounty hunter, Dengar) that adds an extra dice to all your Primary Weapon attacks.  This title pushes the Jumpmaster from 2 red dice to 3 dice - adding exactly that critical 'Overload Dice'.  

So is that 12 points well-spent?  Well the simple answer is 'almost certainly, yes'.  And in fact because it's 12 points exactly it makes it very easy to see this because it's basically exactly the example I just showed above with the two Z-95s vs the X-Wing.  How much better is it to spend that second 12 points on turning a Z-95 Headhunter's 2 red dice into an X-Wing's 3 red dice, rather than as a second Z-95?  Well, up to 15% better against high Agility ships.

So does that mean 12 points is the fair cost of an extra red dice?

Well, that depends.  If the 12 points were going onto a HWK-290 to give it a second red dice then the answer would be "hell, no", as that second red dice is unlikely to be an Overload - trying to turn the HWK-290 into a damage dealing machine is throwing good money after bad.  If the 12 points were going onto a TIE Phantom to give it a base of 5 red dice then I'd tear your arms off to fit that for just 12 points, because it would almost always be an Overload and add almost a full point of damage every single time I fired.  Get into Range 1 with that theoretical overcharged TIE Phantom and you'd be one-shotting Soontir Fel with ease, Evade token or not!

Away from the specific example of the Punishing One, the huge importance of having an extra red dice explains why so many more people are willing to pay 7 points for a Heavy Laser Cannon that cannot shoot at Range 1 than they are to pay less for a Mangler Cannon that fires at any range and is more likely to deal a Critical damage.  That 4th red dice of the Heavy Laser Cannon is often going to be the extra dice that gets around a TIE Fighter's three green dice and pushes through the damage, which is well worth paying a little extra for.  

It also makes you re-evaluate pilots like Miranda Doni, who can add an extra red dice at the expense of a shield, or the Scum Y-Wing ace Kavil.  Adding a red dice is phenomenally important for the amount of damage you deal out - it's not just "+50% damage" to go from two red dice to three, it's often "+100% or more".


TL,DR

"Roll more dice."

Hell, I'll go even better, because this pretty much exactly sums up the Z-95 Headhunters vs X-Wing Interceptor question...

"Roll More Dice > Roll Dice More"

Yeah, there you go.  I should stick that on a T-Shirt, I'd make millions.


Hopefully this has given you some simple things to take away and think about, without working your noggin too hard!  

I'm going to be following up with a second part where I look at how a basic bit of X-Wing maths can really help you make the right decisions, both in building squads and in making actions and flying your ships.

Tuesday 9 February 2016

"Watch Out For Ground Fire" - Taking the T-70s to a Store Championship

Hot on the heels of my little dabble with competitive X-Wing in my last blog, the Store Championship season came to town and it was time to step up the plate and test my mettle.  I was sticking with a 3x T-70 X-Wing list, as I'd played before, but in the intervening week I'd changed my list almost completely.


After my success of going 2-1 first time out I'd had another evening of playing against my mentor, Dan, in which I lost every single game.  Some by a small margin, some comprehensively, but as is always the case you learn much more from defeats than you do from victories and I had gained a new perspective on the weakness of my fast-moving squad of T-70 Aces: they needed to get lucky.  

Ok, well, maybe that's harsh.  They didn't get to get lucky to win, but they definitely couldn't afford to get unlucky.  By putting all my points into a couple of highly maneuverable pilots I was pulling off some flashy moves, but I wasn't really affecting the actual dice rolling side of the game that much and time and again it cost me games.  A small run of bad luck with the green dice... my ships exploded.  A small run of bad luck with the red dice and my ships wouldn't destroy any of my opponents... and then they'd explode.

With a following wind I danced around the table like a butterfly, stinging like a bee.  All too often those insect roles would be reversed, though.  Heading into a serious tournament I wanted to refocus a little and settled on a more steady list of T-70 X-Wings (after briefly flirting with bringing Wedge's T-65 into the mix), featuring a couple of characters you might recognise from my Beginner's Guide to the T-70 blog.

T-70 X-Wing
Poe Dameron / Veteran Instincts / R5-P9 / Integrated Astromech
(35 points)

T-70 X-Wing
"Red Ace" / Comm Rely / R2-D2 / Integrated Astromech
(36 points)

T-70 X-Wing
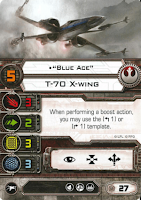
"Blue Ace" / BB-8 / Integrated Astromech
(29 points)

It's a budget version of Poe Dameron, leaving the Autothrusters on the side to play Integrated Astromech and save two points for elsewhere in the team.  That sacrifice enables me to bring in two solid performers: "Red Ace" is the most resilient T-70 build, while "Blue Ace" is arguably the most maneuverable and one of the best close quarters dogfighters available.


If all I do all day is face K-Wings and Twin Laser Turrets then I'm going to miss those Autothrusters badly, but if I avoid those then I'm almost certainly better for making the switch to better pilots without the Autothrusters.

In testing I really liked putting Lone Wolf on Poe but it makes the list 101 points and forces a compromise somewhere else, plus while Poe flying out on his own with Lone Wolf is very strong it did force me to run the squad in two seperate attacks or give up on the Lone Wolf bonus.  All told, Lone Wolf was set aside for the more traditional Veteran Instincts.


Round One: vs Andy ("Super Dash")

Andy was running the popular combination of "Super" Dash Rendar in his YT-2400, and Corran Horn's fully-loaded E-Wing.  This brings two tough ships to the table and basically his plan is to force you into trying to kill Corran while Dash Rendar uses his pilot ability to run loops around you, ignoring asteroids, picking you off with his unique 360 degree-arc Heavy Laser Cannon.


The Good News: I've played against this list before in practice, so I've a plan (I can't catch or pin Dash, so kill Corran).

The Bad News: I've lost every single practice game regardless of having a plan.

Andy set up on his right-hand corner with both ships while I was central and opposite with my ships.  I knew Dash held the advantage if we fought near asteroids so I wanted to take the fight into a clear area in the middle of Andy's side of the board.  On the first turn we both raced forwards, then arced in towards each other on the second turn and opened fire.  "Blue Ace" took a beating very quickly but limped on while I focussed all of my firepower on Corran Horn.  That focush paid off in the second round of shooting as I punched through his shields and dealt a very nasty Critical Hit - a Damaged Sensor Array that meant Corran couldn't perform any actions until it was fixed!

This was bad news for Corran as Andy's whose whole build is intended to maximise his actions with Push The Limit.  Without the ability to Focus and Evade the E-Wing becomes a pretty vulnerable target with nearly 50pts riding on just a measly few Hull points.

The crit was a big help but I still wasn't feeling too good about my prospects of victory  It was taking too long to bring Corran down and the damage from Dash's cannon was starting to add up... Blue had already sacrificed BB-8 to keep his X-Wing in one piece, and now Red Ace and Poe had taken a few hits too.  The good news was that the damage was getting spread around as I kept feeding Dash a different target each turn, but damage was damage and at this point a solid hit from the Heavy Laser Cannon could easily cost me a valuable ship.

Then Andy made his mistake.  Rather than continuing to turn Dash in his circular loop around the fight and keep up pressure on me, he turned away.  Those two rounds before Dash was able to swing back around and rejoin the fight were enough for me to finally kill Corran while he fiddled with his Sensor Array, then also time to reform my squadron and regenerate lost shields on both Red Ace and Poe.  It was now a full X-Wing flight vs a single YT-2400 freighter.

Pew, pew, pew!  Pew, pew some more!  Dash was done.

VICTORY! 
100-0... this X-Wing lark is easy!


Round Two: vs Vader/Soontir/Palpatine

0-100... this X-Wing lark is really hard!

This round I played against the resurgent Darth Vader in his TIE Advanced with the sexy new Advanced Targeting Computer from the Imperial Raider.  Accompanying the dark lord of the Sith was the cream of the Galactic Empire: Soontir Fel in his trademark Interceptor and the Emperor himself aboard a Lambda Shuttle.  It's a really solid list and annoying as hell to fly against: with the Advanced Targeting Computer and Emperor Palpatine the dice are constantly being subtly pushed to favour your opponent so you've really got to get lucky and have your own dice overperform to be fighting on an even footing.


I've practiced against this list as well and in the practice game I tried to take the Shuttle down first... that took too long, though, and with Vader and Soontir crawling over my back my ships melted away before the Shuttle went down.  But I had a new plan: Darth Vader must die.

He set up in a defensive position in one corner of the table and I raced straight at him, closing hard and focussing fire onto Darth Vader while Soontir danced away onto my flank.  Vader slipped away towards the middle of the table and my X-Wings struggled to follow him as I'd come in too hot and couldn't turn around easily.  While I jockeyed to reposition  behind the TIE Advanced I left my ass exposed and the Lambda shuttle crawled out of the corner and began taking shots with it's surprisingly-effective 3 red dice.

I stripped Vader's shields down in the next round... but it proved expensive as Vader had "Blue Ace" in his sights and a bad batch of green dice meant X-Wing exploded unexpectedly into a ball of flame.  "Red Ace" and Poe Dameron chased Vader into a corner while Soontir and the Lambda struggled to get around to help and I felt confident of evening the odds, but then in three rounds of two of my X-Wings unloading on the cowardly Vader I didn't deal a single damage to the shieldless TIE Advanced.  It was simply too hard to fight past the Focus and Evade tokens on top of 3 green dice AND the Emperor's insidious ability to manipulate the Force and flip dice his way.

So Vader lived to fight another day and now as Soontir Fel and the Shuttle rejoined the fight another round of truly awful green dice saw Poe Dameron evaporate.

"Red Ace" vs a fully armed and operational Palpmobile squad.  It didn't take long.

DEFEAT
0-100


Round Three vs Chris (Falcon & two B-Wings)

Chris was bringing the venerable YT-1300 to the table, with Chewbacca in the pilot seat but a ton of extra firepower from bringing both Gunner and Predator as his Elite Pilot Talent.  Chewie was flanked by a pair of B-Wings with Fire Control Systems.  I'd played against something like this and wasn't that scared: I know my T-70s outclass the B-Wings, and if Chris had downgraded Han Solo to Chewbacca then I was confident I could outclass the YT-1300 as well, once the B-Wings were out of the way.


As we converged our ships into an enormous bumptangle(tm) in the centre of the board I rapidly destroyed one of his B-Wings and began removing shields from the second B-Wing to boot.  This was going precisely to plan.

But I'd miscalculated.  Yes I was right to not be scared of the B-Wings, but Chewbacca hit like a truck and my boys were in real trouble.  The combination of Gunner and Predator meant that he could roll his dice, reroll them with Predator to get a good score, then if I somehow managed to avoid taking a beating he'd just try again!  I'd definitely underestimated just how reliable Chewie was at dealing damage (at Range 1 he gets 4 hits 65% of the time)!

I'm not sure if it was a game-winning play from Chris or if I would have lost anyway: the turn after we had all bumptangled(tm) everyone into everything I was planning how were going to untangle.  It looked like Chris's moves were very limited - his B-Wing was bumped up against the side of the Falcon and would have to probably either 3 Forward or turn to the Left, either of which I could cover and finish it off.  His Falcon was also stuck with both Poe and " Blue Ace" in front of it and an asteroid as well - he'd probably have to scream forwards at full speed and just deal with hitting a rock.  I programmed my moves to follow him and... he just deliberately bumped both his ships so they didn't move at all!  That meant my ships, which were flying into the space I assumed his ships were going to vacate, also bumped up... disaster!  This meant no Focus for Poe, no target locks, no anything.

Trapped at point blank range against the B-Wing without his Focus token Poe Dameron threw his hands up in despair and simply exploded.  Trapped at point blank range against Chewbacca my "Red Ace" took a beating and lost the last of his shields then had to throw R2-D2 under a bus just to keep flying.  I made sure we untangled on the next turn and took down the B-Wing but as we disengaged to opposite sides of the board and lick our wounds it was clear I was behind - I needed to deal 12 damage to Chewbacca before he did a combined 5 damage to my two remaining X-Wings.

My one hope was to try and tie him up on an asteroid and unable to shoot so I flew a long loop around the edge of the table to put rocks between us, but Chewbacca could turn too tightly and his turret arc meant that he didn't even really need to bother with the asteroids.  Finally I realised I simply had to get lucky and turned my X-Wings in to roll the dice and see what happened... "Blue Ace" stripped Chewie's shields before exploding, then next turn "Red Ace" dealt 4 damage and left the Falcon close to death... before exploding.

Chewie hit like a truck in that game.   Like.  A.  Truck.   Autothrusters might have helped a bit in this matchup but probably just recognising that crucial bump turn was going to happen would have made the difference as the margin of defeat was so small.

DEFEAT
74-100 


Round Four vs Bob Dee (Corran Horn & 2x A-Wings)

It became rapidly obvious that Bob is a real veteran of X-Wing and has been to dozens, if not hundreds, of tournaments.  We had a really enjoyable game that really reaffirmed how much I'm enjoying entering the X-Wing community.  Unfortunately for Bob, lovely though he is, he was running a Rebel squad that he was rapidly losing faith in, which featured two heavily-loaded A-Wings and a compromised Corran Horn.

Green Squadron Pilot / A-Wing Test Pilot 
 Push The Limit / Juke / Proton Rockets / Autothrusters

That hefty A-Wing loadout came in at 29 points apiece for his two ships, leaving him just 42 points for a Corran Horn with R2-D2, Fire control System and Veteran Instincts.  Looking at a list I'd never played against before I decided that I was primarily scared of his range 1 Proton Rockets - if I could avoid those then I felt like his A-Wings were going to lack firepower and I could take his list down.

Setting up roughly opposite each other we screamed past at full speed, winging each other's ships but not doing any real damage, then both squads turned around for a second pass.  Screaming in again we traded my "Blue Ace" for one of Bob's A-Wings, while the other A-Wing lost it's shields.  Better yet, my ships came out of this pass in better positions and now "Red Ace" was right behind the second A-Wing and Poe was behind Corran Horn.

Bob did the only sensible thing... he ran away.  For the rest of the game.  "Red Ace" chased the A-Wing across the table but couldn't land the final point of damage, while Poe Dameron chased Corran Horn into another corner but couldn't get anything meaningful to land against Corran's high agility and his R2-D2 shield regeneration.

At the last minute I switched Poe onto the A-Wing to try and bring it down to claim a win but it was in vain and time was called with the score at 29-29 - Bob's A-Wing and my "Blue Ace" exactly matching each other in cost.  I'll claim a moral victory for having been the one chasing the win for the second half of the game, but unfortunately a moral victory doesn't actually get you any more points!

Across the table Bob was post-match dissecting his squad, and we agreed that he simply had too many points invested into A-Wings that spent most of the game running away because they're too valuable to risk in combat.  Neither Juke nor Proton Rockets had been of any use in the game, and if you remove those 14 points from the list then it could have been a whole Z-95 Headhunter and a pair of Crack Shot elite pilot talents instead, and then the game might well have gone differently.  But then, as Bob said, once you take the Proton Rockets away from the A-Wings you've no reason to be running A-Wings at all!  It was just a bad list, and I'd been unlucky not to claim a clean win.

DRAW
29-29


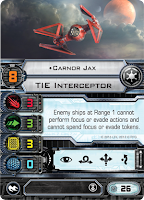
Round Five vs Andy (Vader/Carnor/Palpatine)

Into the final round and fighting to finish in a reasonably place for my first tournament.  I had one last opponent standing in my way: Andy, who was running a slightly different version of the Imperial list that had crushed me in the second round of the day.  Fantastic.  As best I could judge it, Andy had traded Soontir Fel down to Carnor Jax and removed Darth Vader's Engine Upgrade in order to give him Predator over Veteran Instincts, and put a Tactician onto the Lambda Shuttle with Emperor Palpatine.  I was pretty sure these changes made his list worse, but I still needed to turn around a 0-100 drubbing at the hands of a similar squad so felt the odds were against me.

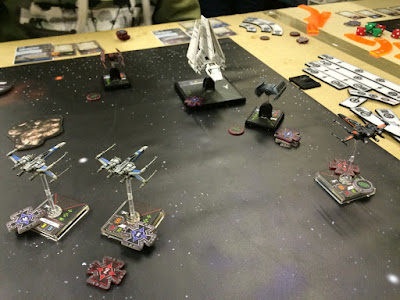
The first engagement, next turn we all bumped up in a big muddle of ships where Vader is now.
Andy started with the typical slow inching out of the corner from his Shuttle while I raced across the table, then on the second turn all three of my X-Wings converged on Darth Vader as I kept faith with my plan of targeting him as the weakest link in the Imperial list.  I managed to shake Vader up a bit but his return fire on "Blue Ace" was withering, leaving my X-Wing down to just 2 Hull after a single round of fire!

 "Uh oh", I thought, "here we go again".

The next turn I predicted he would try and create a bumptangle(tm) and hauled back on the throttle to give myself shots, while both Carnor Jax and Darth Vader bumped up against "Red Ace" and "Blue Ace" respectively.  I took more hits but didn't lose a ship, and now would come the critical moment as we attempted to unpick the tangle of ships with our next maneuvers.

Remembering how much I'd been blindsided by Chewbacca refusing to move out of a bump in the third round of the day I plotted moves that would, I hoped, frustrate his efforts to pin me down and instead put me in clean space... and it worked perfectly!
  • First to move: the Lambda Shuttle predictably shunted forwards but bumped into Darth Vader, going nowhere.
  • Second to move: "Blue Ace" activated a daring 3 Bank move that sent him around the far side of the shuttle, then his unique hard turn Boost action allowed "Blue Ace" to spin around and bring the tail end of the shuttle into his firing arc.
  • Third to move: "Red Ace" flung a Tallon Roll away to his left, putting him in position to sweep in behind wherever Vader and the Interceptor went with their moves.
  • Fourth to move: Carnor Jax made a slow turn into the space "Red Ace" had just left, and right inside "Red Ace"s firing arc.
  • Fifth to move: Darth Vader turned hard around the front of the shuttle and back towards his lines, now facing directly into both "Blue Ace" and "Red Ace".
  • Last to move: the one thing that hadn't gone perfectly - Poe turned hard but couldn't clear his move before bumping into the back of Carnor Jax.  He'd only be taking fire from the Shuttle, but it was Range 1 and he'd have to hope to get away with it.

After the 'bumptangle' resolved - Blue is behind the shuttle, Red has completed his Tallon Roll while Poe is behind Carnor.
Nobody died in the shooting that followed but those maneuvers of mine had set up how the rest of the game would unravel.  Andy's Lambda was now out of the fight as we scrapped behind it, Carnor was facing the wrong way with both "Red Ace" and Poe right behind him, and "Blue Ace" had come back around to ambush Vader and the Shuttle.  The thing is, I knew from bitter experience that Vader is like a cockroach that refuses to die so I didn't want to leave it to "Blue Ace" to get the job done, and this time Poe followed Vader around to make sure, leaving Carnor Jax to "Red Ace".

Sending Poe to help finish Vader off worked worked, and with a spectacular three blank green dice... Vader was down!


Better yet, the next turn saw Carnor Jax so desperate to lose "Red Ace" from his tail that he jinked onto an asteroid... and right square in the range 1 sights of "Blue Ace".  Suddenly Carnor was down too!

There's a TIE Interceptor-shaped hole right on that asteroid there.  Good shooting, Blue!
The Emperor ran (well, it's a shuttle, so if he ran then it wasn't running fast) and my X-Wings hunted him down.


You know that bit in "Revenge of the Sith" where Mace Windu has the Emperor at his mercy but gets distracted by Anakin and ultimately the Emperor turns the tables and kills the Jedi?  


Well that's not what happened this time.

VICTORY!
100-0

After my drubbing against a similar squad earlier in the day I have to say that this result felt REAL good.  I'm sure Andy's list was worse for the changes he made, although I understood the choice of Carnor Jax because he was a bit frustrating in denying Focus tokens to Poe.  The triple-blank the saw Darth Vader removed was unlucky, but then he was down to 2 Hull with two X-Wings at point blank range behind him, so there were good odds that he was going down that turn.


Final Record: W2-D1-L2
Overall Points Score: 303-229