Regular readers may recall my exploits with TIE Fighters at the Yavin Open and Regional but since then I've had very little opportunity to play. I was on holiday for the next two Regionals, didn't join our raiding party to Italy for the Kashyyyk Open, and the two Regionals after that were just a little too far away. Where other players in my team have clocked up playing in four or five Regionals I've managed... just that first one, actually.
This past weekend marked the UK National Championships and my last chance to throw the TIEs into serious combat before Wave 9 arrives. Since Yavin I'd spent a couple of months messing about with other lists but when it got close to the deadline for submitting my squad I only had one strong option: the Slaughterhouse TIEs.

As the list hasn't changed I'm going to blatantly copy/paste my description of the team from my Yavin report.
"Slaughterhouse is a Crack Swarm variant which trades the sixth TIE Fighter from a classic Crack Swarm for higher Pilot Skill across the swarm and the endgame prowess of Omega Leader.With Zeta Leader and Scourge's abilities I still roll the same 12 red dice on initial engagement that a Crack Swarm does but, sometimes critically, I roll them much earlier in the combat phase as my PS is that much higher. This is most material in matchups against other Crack Swarms where I'll frequently take two of their TIEs off and create a pivotal advantage before they can open fire, and it also flips the matchup against PS6 Brobots where instead of usually losing a couple of ships to their PS6 I've got a very good chance of removing one of the Aggressors before it can fire.Occasionally the higher PS does matter for maneuvering as well - the Dash lists don't like that I could potentially have 4 of my ships moving after Dash as they're used to having perfect Barrel/Boosting information to keep the TIEs at arm's length - but most commonly the high PS is leveraged in firing earlier and removing targets before they can fire.The transition down to five TIEs does come at a price, most notably that as my ships are destroyed you're taking a greater % of my firepower at a time and when I've played against some high PS lists I've had to be more cagey in my play. Perhaps my single heaviest defeat with this list came at the hands of a Dengar/Boba Fett squad that had given both the pilots PS10. Jousting me heads-up with Glitterstim for the initial engagement he simply blew me away.But outside of that sort of scenario I'm convinced this is better than a basic Crack Swarm in most of the key matchups, especially mirror matches against other Swarms and against Brobots. If Slaughterhouse is 'Crack Swarm+' then the '+' in that is Omega Leader, and I can't even begin to count the number of times that it's my trusty O.Leader who deals the lethal damage. If he was just any other elite TIE then I'd be back at six ships, but bringing Omega Leader in for the endgame without sacrificing any of the Crack Swarm's alpha strike power occurs to me as being the best of both worlds."


Yavin had seen me make some critical personal play errors and I felt that my 4-2 finish on the first day was not doing the squad justice. On the first day of the UK Nationals I managed to eradicate most of those from my games and actually played very well in some tough games, going one better to end the day on 5-1 despite having had very little decent preparation.
- Round One: Triple Imperial Aces (Win: 100-35)
- Round Two: Dengaroo (Win 100-44)
- Round Three: Triple Jumps (Win 100-56)
- Round Four: Dengaroo (Loss 21-100)
- Round Five: Triple Imperial Aces (Win 65-18)
- Round Six: Triple Jumps (Win 100-45)
The meta had definitely come out to play and every round I faced top ships and tough opponents. That made it all the more pleasing that my TIEs eased through the challenge and into the second day, which was a cut to Top-32 knockout rounds.
As always I'm not a huge fan of tournament reports so I won't bore you with the blow-by-blow of those six rounds but I'd like to share my two knockout games on the second day, which were both intensely fought and desperately close games.
Top-32 vs Stephen Gage
- YT-2400 - Dash Rendar (Push The Limit, Outrider, Heavy Laser Cannon, Kanan Jarrus, Engine Upgrade)
- VCX-100 - Lothal Rebel (Hera Syndulla, Fire Control System, Autoblaster Turret, Intelligence Agent)
My initial reaction to turning up on Sunday morning to find Dash as my opponent can be summed up by this message that I sent to my team as we set up...
 I was not thrilled. Dash is death to TIE Swarms as he picks off your flimsy ships with his big cannon while running away faster than you can chase him. With most of my TIEs PS7+ if I win the dice roll I can gain an edge in that he doesn't know where my TIEs are going when he Boosts/Barrels (Stephen was at 99pts with a bid, so that wasn't an option), but I still hate to see Dash and this was going to be an uphill struggle.
We lined up with my TIEs jousting the Ghost head-on while Dash would circle around behind me. On the second turn he threw the Ghost forward in an unexpected 5 K-Turn that bumped a lot of my ships up (I'd been expecting a 4 straight). That move turned out to have mixed results for Steven and although his Ghost absorbed a bit less fire from my TIEs it limited his output to the Autoblaster turret, which he aimed at Omega Leader and then blanked on. With Omega Leader also dodging Dash's fire shot of the day I managed to escape the bump without a scratch.
On the next turn I successfully called the Ghost's dial and my TIEs swarmed around it, culminating in a Ghost-sized hole in the table as I removed the Lothal Rebel in a second round of shooting! This was now going about as well as I could hope for as I was down to just facing Ghost with all five of my TIEs remaining, but even from this position I knew I was going to be in trouble.

Rather than send my scattered swarm after Dash straight away I deliberately turned them away to the opposite corner to reform the swarm out of range of Dash, while Omega Leader dared enough to chase Dash and keep him from turning back to the others straight away, stripping a couple of shields away as he did so. While the rest of the swarm formed up poor Youngster strayed a little too close to Dash and a clean HLC shot took him down.
I had four TIEs left, then, when a critical moment occurred...
What was left of my swarm was stressed after K-turning, but largely reformed in the far right quadrant of the table while Dash and Omega Leader were on the near-left quadrant with most of the asteroids arranged up the left hand side of the table. With my swarm now facing the right way I knew that Dash would run into the rocks to hide while I chased him down, so I set my dials appropriately.
Then Stephen said something to the effect of: "I'm supposed to be hiding in among these rocks over here, but for some reason you don't want to go there. Haha!"
"Yeah, for some reason!" I laughed.
Then I stopped dead in my tracks.
I've played tournaments of different games for over two decades and my spidey-sense was tingling at what Stephen had just said. I knew that Dash was going to run for the rocks, and Stephen knew that Dash was going to run for the rocks. That's why he'd said that's what he was going to do.
Because it was what he wanted me to think he was going to do.

I looked at the table again with new eyes. Yes the run for the rocks was the obvious play because it was the safest place for Dash to be. No, wait... it was only the second-safest place. The actual safest place for Dash to be was behind my swarm!
I picked up Scourge's dial and changed it from a 2 bank towards the rocks into a 5 straight. I picked up Omega Leader's dial and changed it from a 5 straight after Dash into a 2 straight.
Set. Done. Thumbs up. Reveal the dials.
Scourge's 5 straight put him right smack where Dash's attempt to cut behind my TIEs had taken him, leaving the YT-2400 bumped and vulnerable in arc of all three of my other TIEs, and my Omega Leader's 2 straight even putting him at range 1!
Dash took withering fire and managed to escape next turn with only a couple of hull points left.
That critical moment gave me a huge foothold in the match but it wasn't done yet. As Dash escaped from my impromptu trap he managed to take Zeta Leader out and damage Scourge, Omega Leader chased him around for what I hoped would be the killing blow but only managed to get Dash to one hull before a fantastic roll of the red dice from Stephen saw Omega Leader taken out despite his lockdown on the dice!
This was bad, from the five TIEs I had left when the Ghost went down I was now down to just Howlrunner and Scourge who had only 1 hull left. Yes Dash was almost dead but he was still swinging those big 4 dice attacks and my delicate TIEs wouldn't last long.
On the next turn I misjudged Stephen's play as once again he tried to get around behind my TIEs instead of running across the front of them. I left Scourge stranded out in the middle nowhere and about to be obliterated, but with a heroic barrel roll Howlrunner managed to spiral backwards into range one of Dash and get a shot off - perhaps here was a last gasp chance to win the game?
Three red dice, no focus, against two focused green dice. The odds work out that I would miss entirely 60% of the time but I got lucky... blank, hit, hit from Howlrunner's dice and Stephen could only manage to focus up a single Evade!

Howlrunner the heroine had saved me from the fearsome Dash and hurled me into the Top-16!
Top-16 vs Luke Pearce
- Jumpmaster 5000 - Contracted Scout (Deadeye, Plasma Torpedoes, Extra Munitions, Overclocked R4, Guidance Chips)
- Jumpmaster 5000 - Contracted Scout (Deadeye, Plasma Torpedoes, Extra Munitions, Overclocked R4, Guidance Chips, 4-LOM)
- Jumpmaster 5000 - Contracted Scout (Deadeye, Proton Torpedoes, Extra Munitions, R4 Agromech, Guidance Chips, Boba Fett)
After scraping through a rough draw against Dash I was thrilled to see Contracted Scouts across the table. I wasn't taking anything for granted because by the time you're at the Top-16 stage there's no slouches left, but this was a much better match for me.
We lined up to joust down my right flank, heads-up vs one of his Scouts with the other two angling in from my left flank. I opened with a 2 straight to retain range options for the second turn, then hurled forward a 4 straight on the second turn. Luke came close to bumping me with a 4 straight of his own but came up half a ship base short.
"I thought you were going to go 5 forward!" he complained, as I revealed my dials.
"I know you did, that's why I did a 4!"
This was perfect. I'd played against Scouts twice on the first day and both time my initial alpha strike had come up one point short of removing a Scout before it could fire. It turned out that this was a critical difference in the fact they're using Overclocked R4 instead of R4 Agromech and because I'd not tested my TIEs much recently I wasn't prepared for it. This time, though, all five of my TIEs were nestled in range 1 and the extra couple of dice I got should be enough to push the last damage I needed to kill a Scout before it could fire even despite Overclocked.
Nope.
My dice were rubbish his dice were good. Even though I threw all my Focus tokens and Crack Shots at him his Scout came away from the initial shooting not only still standing but with two hull remaining instead of one! Even worse because it had taken all my Focus tokens to push for that kill my TIEs were defenceless - Howlrunner exploded from a turret shot and a torpedo, and Omega Leader took a second torpedo shot and limped away damaged.

I was pretty sure I'd blown the game in that round of shooting, but somehow over the next few turns I managed to get back on top. Although the switch to Overclocked R4 has nerfed my initial alpha strike against the Scouts the extra stress means I'm much better at hunting them down after that, which had won me the two games against Scouts on the first day. Once again that proved my salvation as my TIEs turned faster than the Jumpmasters and got behind them, finishing off the wounded ship and rapidly punching through the shields of a second one. Omega Leader pulled away from the fight to re-equip is Evade and Target Lock before returning to the fight while Scourge and Zeta pulled great positions and poured on the firepower.
My chances took a bit of a knock when Zeta Leader unexpectedly blanked his green dice and died from a turret shot that should have been pretty harmless but as the second Jumpmaster exploded I still had Scourge and Omega Leader left to tackle the last remaining Contracted Scout, which only had 1 shield left.
Then... disaster!
A second blank green dice roll saw Omega Leader fall to another opportunistic turret shot from the Scout and I was suddenly one-on-one between Scourge and the Scout. What was utterly critical was that the Jumpmaster still had one shield left - that not only kept Scourge locked away from rolling his extra red dice but it also meant that I wasn't getting half points from the Jumpmaster and Luke was ahead on points against my lone TIE Fighter!

For about half an hour our two ships dodged, ducked, dipped, dived and dodged their way in great zig-zag patterns up and down the table as I tried to buy shots and keep Scourge in one piece. It was a duel where Luke held the upper hand as his tight turns and barrel roll would constantly threaten to bump my TIE and prevent my firing, but if I ever tried to break away from the close dogfight I would likely face a torpedo shot from Luke's last remaining piece of ordnance.
The clock ticked down inexorably as I failed time and again to scratch the Jumpmaster's shields, and although I feel like variance had gone against me earlier in the game (both in the initial engage and the deaths of Zeta and Omega) it absolutely went my way during this duel as time and again I rolled 3 Evades to keep Scourge flying.
With minutes left on the round Luke switched to simply barrel-rolling to block me each turn and I had no choice but to throw caution to the wind and try to force the win. I pulled a big K-turn to get separation, although that finally gave Luke a shot with his torpedo that saw Scourge take a hit and a crit - some Structural Damage that reduced my agility!
The next turn would be vital: Scourge cut into a range one shot just as the TO shouted time on the round... I would have one more combat phase to deal two damage and win the game with half points from the Contracted Scout...
Three red dice: Blank, Focus, Focus. Focus up two hits.
Two green dice: Blank, Blank.
I've done it! I've bloody done it! Two damage means I'm ahead in the game! I just need to survive the Jumpmaster's final shot and Scourge has proven invincible thus far!
Three red dice: Hit, Hit, Crit
I've only two green dice. I've only got one hull left. That's not enough of either.

Game, set, match and tournament.
Rounding Up
So in the knockout rounds I beat the squad I should have lost to, then lost to the squad that I should have beaten. I can't complain about that. All told I was very happy with how my TIEs performed and even more pleased with how I performed, and felt like I'd done my list a lot more justice than I managed in Yavin. The wonderful 186th Squadron has now published the entire Top-32 squad lists and I found it really interesting that the three TIE swarms to make the cut to Sunday all had something in common - we all played Omega Leader, and Paul Hughes' list was even more similar in that it ran five TIEs with Zeta Leader. I thought I was ploughing a lone furrow with my list but obviously not.
If you're interested in giving the elite Slaughterhouse TIEs a try then I've got a few simple tips and thoughts for you to get started.
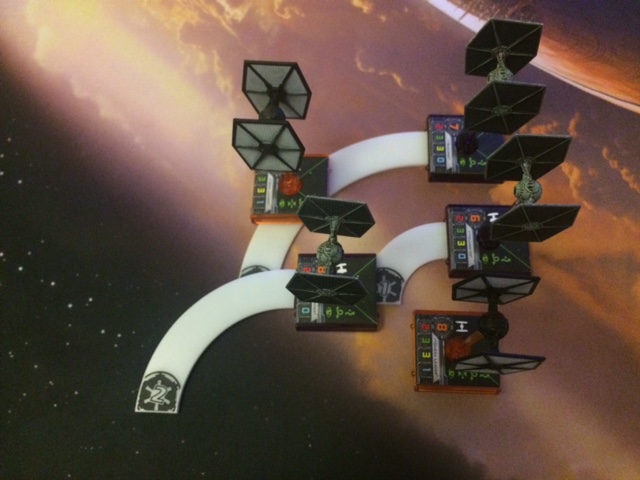
On Formation
There's a specific formation to run that I've developed over time. As you put your TIEs down try and work out which direction you are most likely to turn it. It's not a disaster if you have to turn the other way but it helps to get it right. Youngster goes on the front corner of the formation in the direction you're going to turn in, Scourge goes in the middle of the front row and then Zeta Leader goes on the opposite end of the front row. Omega Leader then slots in offset behind Youngster so that he won't run into the back of Scourge if he gets bumped, and Howlrunner in the same position behind Zeta Leader.

Why so specific about the line-up?
- Youngster has the lowest PS so if he gets stuck at the back of the formation he's forever having to leapfrog your other TIEs and it all gets a bit more complicated. If you're going to turn right you want him to be the pivot of the front of your formation and not filling in behind.
- Zeta Leader is probably going to stress when he fires and so having him on the end of your firing lines allows him to throw the hard 2 turn without crashing into Youngster or Scourge as they wheel about. Alternatively being on the outside allows him to S-Loop off to the side and clear space for Howlrunner to K-Turn in past him.
- Scourge, as PS7, wants to sit in front of the PS8s. You want to make sure he's not a blocking worry for Howlrunner or Omega Leader as well in case he gets bumped and pushed back half a ship base in your formation. I developed the offset back row after playing against Jumpmaster players who loved to run a 3 Bank and Barrel Roll to bump my TIEs on the initial engage - in this formation all they bump is Scourge and the other four TIEs slot in around him even if he can't complete his move.
- Omega Leader wants to be the closer of your two PS8s on the back row because it might make the difference on landing his target lock.
- Howlrunner wants to be on the outside because it might make the difference on either being out of range of some incoming fire, or at least of getting an extra dice at range 3. Also, as Howlrunner doesn't reroll her own dice she's got the least reliable shots so if she's the one who misses out on firing due to being out of range you've lost less than if it's Omega Leader who can't fire.
On Openings
Most of the time you'll open with a 5 straight. You want to make the table as small as possible and get on top of the opponent before they can re-organise. You're looking ideally for a setup position that has two lanes for your second turn - a straight run to the opponent or a cut inside to a 45-degree lane in case they try and run across the back. That gives you options and makes you less predictable. You fear very little in the joust, even other Crack Swarms or Brobots can be taken head-on because you'll fire first and shred their damage output back at you.
What you DO fear are ships with PS9+ that are aggressively-loaded because they do to you want you were planning on doing to them. Perhaps the worst matchup I've had was against a Boba/Dengar pairing at PS10 who were happy to joust me head-on and remove Howlrunner before I could fire, then a second TIE with Dengar's revenge attack.
As with most jousting lists you need to learn your Rule of 11 maths. In the Top-16 match against the Scouts I opened on a 2 straight because that gave me control over the range of the engagement on the next turn. If I'd raced forward a 5 straight then my opponent understands very well where I'm going to put my ships the next turn but a 2 straight gives me options. Things like that take time to learn what your opponents want to achieve in their approaches so you can adjust yours to suit.
On Dengaroo

When I first met Dengaroo it was like this list ran into a brick wall. I got utterly annihilated and came away from that encounter feeling like I was Dengaroo's dream opponent - I was the TIE Swarm with only five TIEs having spent points buying PS that didn't make a difference in the matchup.
After playing against Dengaroo a bunch more times I'm not so sure about that evaluation, and in fact I think I'm quite a bit better than a standard TIE Swarm is against Dengar. It's still not an easy match, but I think it's far from unwinnable. What's changed is that I think my elite TIEs pose Dengar problems that basic TIEs don't, so long as you play them cagily enough that they survive enough turns to make it count.
When a standard TIE Swarm rolls up it hurls the Crack Shots at Dengar and buys a few points of damage, but then it's pretty much punched itself out. From there on in it's rolling two red dice with Focus against two green dice with Lone Wolf and Focus, so forever facing an uphill struggle to deal a single point of damage. My TIEs, on the other hand, with Zeta Leader, Scourge, bring more painful three/four dice attacks that can continue to chip Dengar down and Omega Leader brings a whole new threat and requires them to be very certain of when they want to use Countermeasures.
Is Dengaroo a good matchup? Hell, no,but it's better than you might expect. Oh, and block the sloop. Block. The. Sloop.
 On Contracted Scouts
As I said in my write-up of the Top-16 match the Contracted Scouts maths have changed a lot since they switched from Agromechs to Overclocked R4. I used to be 85%+ to kill a Jumpmaster before it fire and now that must be more like 30-40% if they're prepared to refocus a couple of times to stay alive. However the flipside of this change is that my midgame against the Jumpmasters is now much easier and, if anything, the matchup has actually improved a little. The worst turn was always the one when I wanted to K-turn after the initial engagement and they wanted to S-Loop for a second torpedo shot against my stressed TIEs, but now I don't have to worry about that anywhere near as much.

On Youngster
If I had a dollar for every time I get asked why I'm playing Youngster with Crack Shot I'd almost be able to buy a $5 milkshake by now. Youngster makes sense primarily for the Brobots matchup - that's where specifically his PS6 will come in most useful and buy him a shot. Overall, though, with Contracted Scouts and Dengaroo both focussing through my alpha strike that initial engagement seems to have got less critical since I played at Yavin. I'm going to try Backstabber in that role for a while, switching out a Crack Shot up front for more dice in the midgame which seems to be where I'm winning both the Scouts and Dengaroo matches.
On The Future
Nothing in Wave 9 makes me think I don't want to continue playing these guys - ARCS, /SFs, Evade-less Fang Fighters, Shadowcasters; they all look like easy meat to me! The real danger comes not from the new ships but from a resurgence of the old ones. The hot gossip on the street at the UK Nationals was that the Triple Jump's days are numbered and that FFG are going to ensure that they aren't around when Wave 9 lands.
If that's the case then it's not hard to see the metagame swinging heavily towards Dengaroo, and that along with that the Dash/Ghost builds could become more popular as they're very good against Dengar. Neither of these developments would make my TIE Fighters happy. It's something that I'm going to have to monitor closely, and I'm going to need to work on a Plan B in case the gossip proves real and the metagame cycles against the TIEs.
We shall see, but until somebody forces me off them I'm certainly going to be player my Murder H's a while longer!
We shall see, but until somebody forces me off them I'm certainly going to be player my Murder H's a while longer!


